Tuesday, June 25, 2013

Repurpose Your Purpose


Long time no post, right!?

First off, I apologize that I haven't kept constant on my posts. I've been out and about creating new stories and finding inspiration, because lately I've had creator's block. Yes, that's the equivalent of writer's block. Now that I've found inspiration, I'm excited to share.

So let me just inform you on the whole repurpose concept. Take an old shirt or something you find at a thrift shop and make it into something more YOU...Cut it up, tie it up, sew it up. I've become quite familiar with my mom's old sewing machine :3 I've taken my dad's old work shirts and made an apron, an patriotic dress-shirt, took large t-shirts and made them into grocery tote bags. Today I bring you a a men's tank that I got at a thrift store and a shirt I had taken apart before and cleaned up the rough cutting.

Men's Large Tank -->split back women's tank shirt

front view

side view

back view

So yeah, there's the split back shirt. I saw these shirts on pinterest and thought they were so cute.  So I looked up a few d.i.y. ideas. Unfortunately, I came up empty on any 'how to' tutorials. :( So I just guesstimated on how one would go about creating the split back style. Cut the tank right down the middle (backside) and sewed it back up like a racer back, only sewing it closed a quarter of the way down. I'm satisfied with the way it came out. Now compare this $7 repurposed tank to what you find on the net/stores. Yeah, I'm a beast!  


 Blouse --> halter-racer back
front

back (w/bow)

So I took a blouse I had hidden among shirts I never wear and decided to tear it up.  Sorry I don't have a picture of what it looked like before.  So I took apart the sleeves completely. I didn't like the sleeves, they had that slight poof to the shoulders. Kind of like the sleeve below:


Yeah, the style can be very feminine and cute, but I had far outgrown the shirt, but I really like the nautical-like feel the blouse had and didn't want to part from it. So I changed it up. I looked up ideas on Pinterest (a great site for d.i.y. ideas) and found a few no sew repurposed shirt ideas.  First I had two straps going down the back that met at the bottom center- knotted at various points.  However, that looked too messy and bulky. So I took away all the tie-knots and sewed up pieces to make it look more clean. Cleaned up the arm area cut outs and added a bow at the bottom. Vuola!

Altogether both shirts took only a few hours in a day to complete. The tank to split back was really quick. I think it took me like 2 hours max to get it cut, pinned, fitted, and sewn. The blouse to halter took longer because I had to fix previous errors from my last repurpose and then figure out how to make it work using the materials I had left. If you have a sewing machine I highly recommend getting to know how to use it. You'll save yourself lots of money by finding bargain pieces and taking old clothes and making them awesome again! Also, sewing is a great skill to have.

Ok, before I end this post I have a question for my viewers. I have this small boys black t-shirt. Anyone have any suggestions/ideas of what I should do with it? I'd like to hear your thoughts :)


F.Y.I. you can buy any woman's Large/X-large blouse and make a dress out of it by adding a belt :) Just make sure it's the right length.
CIAO <3 <3


Sunday, April 28, 2013

Aye Aye Captain!

So I was doing an activity with my kids (the ones I tutor) that involved a boat, a crew, and some really silly instructions. Swab the deck! Ships Ahoy! Draw the Anchor! and many more as the kids quickly followed in the Simon Says-like activity. Twas pretty fun for both the kids and I. Aye, but that's not why we are here right!?

Not to say that the little sidebar there isn't relative to the sketch. Another sleepless night I spent thinking of things I might do other than ol computer and drain (<-getting sucked into a computer screen until I pass out...zzz) So I picked up my sketch pad and sketched away. Well...sort of.

A day prior I had gone through my art bin, the one with all my art papers, mags, and landscape notes. Did a little spring cleaning and it got me into the ol creativity mode again. Grabbed my huge sketch pad (I have 3-4 different sizes..this one is like 11"x 14" I think. Scanned through unfinished sketches or ones I could build on. Found my page of bird sketches and went at it. Vuola! I've been kind of lagging the upload time. I hesitate because I still don't feel it's quite finished. So check back for updates. I want to give this guy some color.

11"x14" sketch pencil/pen on sketch paper

Meet Plink! My little scissor-tailed flycatcher inspired friend. I saw an image of bird with a long, beautiful tail and thought it was the coolest thing! Looked up some more google images of "birds with long tails." The Quetzal is another bird with a similar anatomy. Just an F.Y.I. The flycatcher uses it's long, wispy tail in it's aerobatic stunts catching its food. These must be the most graceful hunters to watch. So I drew a sketch of a bird with a long beautiful tail. :)

I played around with beak styles. Going from long and curved (like that of a hummingbird) to very stumpy and sharp. I finally compromised with a little of both. I originally wanted to mirror the tail in the head feathers, but took on a Hermes helmet approach instead. The double winged headpiece kind of deal. It has a military feel to it as well. I was trying to make the bird more mechanical in its features to have more of a SteamPunk-ish feel. I also looked some images up of SteamPunk air-pirate costumes so as to incorporate something into my drawing. Maybe it shows...maybe it doesn't.

As for the wings...I couldn't decide how to design them. Like I said, I wanted a more mechanical feel for the bird. However, I was having difficulty deciding what I wanted. I ended up with bat-like wings. I suppose it works. The wings still need work as far as mechanical details (how the wing is supposed to extend out and other logistics). Looks like I need to study some Ornithology. So I best get started!

Aye Mate, until our next embarking!


Thursday, April 11, 2013

Research & ReConfigure


This is a model of the Landscape Architecture building for my LDA model making class. I failed to take any pictures of the front and sides before I took it apart. I had a lot of fun constructing the model and doing the research. Unfortunately, the fun ended when presentation time came and the teacher began to critique. She was one hard ball. I guess you have to be when you're in a male dominated career that is HIGHLY competitive in itself.

Some cool notes about this project:

-Researching the different bike racks was mind-blowing. The one I used here was the coolest and most efficient for the small space in between the building's two longer sides. The building in the middle is some kind of test lab..for what? I do not know. I think plants maybe. The Geology department and I think another department shares the building. Next store is the Plants Sciences building..I don't know. Bad department situating planning?

-I found some really interesting porch swings and waterfall-like porch covers. One inspired by Frank Lloyd Wright himself. Seriously...ARCHITECTURE IS WAAAAY COOL! Maybe I should have posted this in my other blog..merps. Ohswells! :)

-I spent a lot of time designing what I thought were pretty awesome planters. F.Y.I. professor didn't like my ideas or project all that much. gah! Talk about heart breaking. I guess my awesome research didn't quite show that well through my model. Though she kept telling us "abstract! abstract!" In my head that translates as "glarbitty gloobin, glarbitty gloobin"...in otherwords, I dun know whatcha talkin bout sista!
Momentary digression...
So like I said, spent lots of time coming up with cool ideas for the planter and being proud of what I had thought up. Good times, good times. :)

Yeah, so I don't have much to comment on this project. I promise I'll update with something more interesting on my next post. I'm slowly recovering my artistic tendencies. I've spent too long away from my pencil and pad :(

Monday, March 18, 2013

Gimme Some Ocean Breeze

Hey Blogosphere,
  Sorry I've been missing lately. I've had to endure two very long, busy, and hectic weeks. Between waiting aimlessly for Jury Duty and slow days at the gallery and school. However, I have been working on some new stuff.

The weather has been decent, when mother nature isn't driving my sinuses up the wall. Anywho, with the cool weather I've been really yearning some ocean breeze. Well, the ocean in general. I've got my sailor's cap on and my ship ready to sail!

Now let's check out some of the ocean's magnificent creatures!


Captain Starky

These guys aren't anything spectacular, but they were fun to draw. These sketches are really basic, but I do hope to give more character when I figure out what I want to do with them.  

Captain Starky is a mix of a little Steampunk flava flave! haha...I'm still working on my living studies. I think I live too much in my imagination to really be able to sit down and sketch mammals, fish, etc. Maybe I need to take a trip to the zoo? Anywho, here are some more drawings to look at as you scan my blog. Hopefully I have more coming this week. Maybe I'll get on another sculpture. 


Thursday, February 14, 2013

And A Lovely Galentines Day to You!

Happy Valentines day to all my viewers and a special Galentines Holla at these lovely ladies whom I have shared many an adventure with and love very dearly.


These gals (as seen in photo) have been such great friends to me through a lot of the ups and downs of this crazy world. Even miles away we still hangout via Googs + and occasional trips Northward or Southward :). 

Sorry ladies if this is publicly embarrassing, but you must know how amazeballs y'all are, especially for being so awesome and visiting for a Galentines Reunion! Anyways, I'll tone down the sappy. I know how some people get about mushy stuffs lol. I tried to find recent picks of all three of you ladies, and I found this one most suitable...Since it is a perfect reflection of the start of our friendship-as we all met at the Old Cabin. 

So Just wanted to say, Thank you ladies for your friendship!


OK, Now what many viewers/followers have been waiting for...(drum rolls)..........

TA-DA!!
"My Love Runs Deep..."
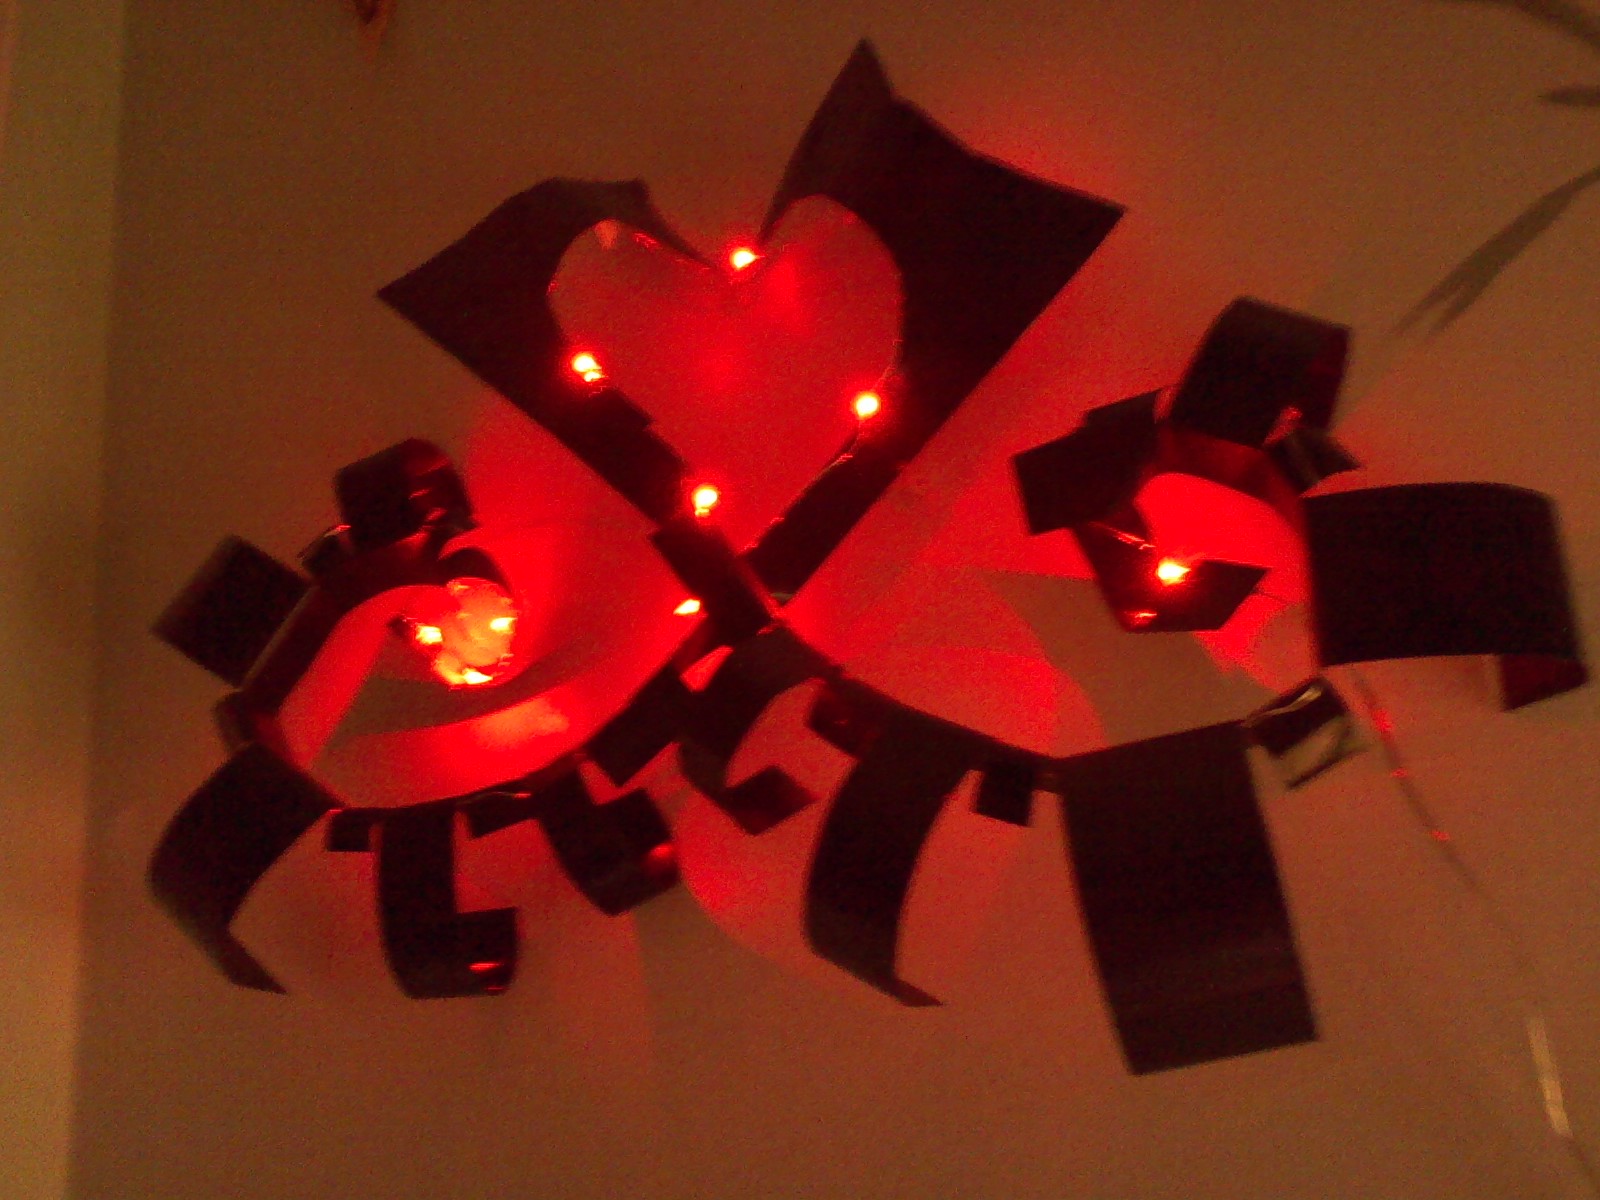
2'W x 1' 1/2" H: sheet metal, LED lights (lights off)

2'W x 1' 1/2" H: sheet metal, LED lights (lights on/angled)

2'W x 1' 1/2" H: sheet metal, LED lights (lights on/forward)
"My Love Runs Deep..." as I've titled my sculpture piece is a piece I would have liked to have entered in an art gallery open exhibit. Sadly, I was unable to finish it in time for registration. :( But I'm not all too bummed out, because I had lots of fun getting back into the swing of sculpture! Besides I'm still able to share it with all of you.

So I added three different images of the same sculpture. One with lights off as to give full effect of the red LED lights reflecting off the black of the sheet metal. For the most part it is done..I just need a few minor adjustments and some tine fin-tachments ;P....The next two images following the first are with the lights on and angled. I took an angled picture otherwise the viewer cannot really see the shape of the heart made by the two conjoining pieces.

Why did I name my piece as I did? Great question!
Let me first explain how I came to design my piece. With Valentines coming up I wanted to do something in relation to love. If you have not figured it by now, the two pieces are representative of two fish joining their tails together to form a heart. I took a sketch I had (image B) from my notes back in College...as I did (and still do) doodle. I love the arching of the fish and spherical forms in general. You can see in (A.) to the left is a slight sight of another fish facing the opposite direction. I played around with the idea of placing the fish emblem together. That's how I ended up at (B.).
B. sketches to Design
I decided to play with the emblem a little more, adding some darker parts and finally some color. The darker areas ended up being the parts of the sheet metal and the glowing red areas are where I cut and left open. So, basically took one of my random sketches and designed a sculpture piece from it. Pretty cool eh!

Alright, so back to the main question..how did I come to name it such? I was trying to come up with a few crafty names for this piece, but couldn't find any. So I looked hard at my drawing and thought..'well, there are red lights running through the body like blood or veins (looking at the sculpture itself the wiring and lights add a vein like effect on the backside) and these two pieces are living creatures that like all living things are just searching for a soul mate or another to form a bond with.' I kept thinking 'blood' & 'inner soul searching'...So I finally came up with "My Love Runs Deep..." as in blood(love, life) runs deep through ones body. And when you find your soul mate you share that love with them and give life. Also, you can think of fish as creatures of the deep sea, searching a vast ocean for some signs of life & a place in which it can only exist (water). So the title kind of takes that sense of "deep(er)" than physical love and plays with that idea. The ellipsis at the end is to give the viewer the freedom to finish and interpret the piece as they wish-perhaps have a more poetic take on it. Any how, I leave it up to the viewer to make something of this.

Hope you enjoy my piece. I'm really glad I have others to share my love with. :)

<3 Amore ti <3


Thursday, February 7, 2013

Dr. Horrible, We Have a Pulse...

Hello my dearest viewer(s),

Hope your week has been better than mine, because tutoring a group of first graders has me pulling my hair most days. If my job were made into a sing-a-long, most of it would include a broken ominous soundtrack...ok, so I'm exaggerating a bit much. I swear, sometimes these kids make me want to crawl into fetal position and rock myself back to sanity. But enough of my wonderful adventures with Dr. Horrible and his minions. Let's solve some of those mysterious shapes from our last post...

1) A turtle 2) my attempt at a bulbasaur 3) boat 4) fish 5) giraffe 6) camera 7) coyote 8) badger? 9) Seahorse 10) dragon

Alright, ya'll want to see some sculpture making, right!? Here it is!

Fig. A: Sheet metal cut, primed (4'Lx 2'H) 
Fig. B: Sheet metal shaped
Ooops! Forgot to tell you, these pictures are just a preview. :) Didn't think I would spoil your Valentine's Surprise, did you? That would be lame. 

So here are just a few pics of my progress I've made since taking a piece of sheet metal and going all Edward Scissor Hands on it (Fig. A). The two pieces cut out have been cut, softened the edges (so I don't accidentally stab myself when putting it together), and put two layers of primer on them suckas. Yes, metal needs to be primed before painting. The primer didn't leave the best of surface texture, but luckily I can always improvise :). 

The next step (Fig. B) is shaping the pieces the way I want to set them. Of course, this is just one piece. I was hesitant about showing a preview of my piece, but I don't think I'm giving anything away with these pictures. I mean, I still have to paint, put together, and add the lighting to ALL of it. Oh, yeah! I also need to add a few minor attachments. 


Fig. C: Shaped and lit (Lit work space)
Fig. D: Shaped & lit (unlit work space)
So there you have it- an almost completely pulsating piece of sculpture. Thought you may want to see what it looks like lit. Hopefully, once I get it painted and the lights properly placed along the entire sculpture the red light will be more reflective and apparent. 

 I'm wishing for some good weather this weekend so I can finish my piece, and research all the reasons why Valentines Day is a joke :)... Or maybe just watch Dr. Horrible's Sing Along Blog, and eat my Christmas chocolate rose, given to me last year by one of my students. Ha!

Tutto รจ lecito in amore e in guerra


Sunday, February 3, 2013

Puzzle Pieces

Buona notte fellow viewers,
 Are you ready for a sample of my Valentine's Day sculpture?

Well, sorry to say you still have to wait 11 more days... tee hee. I'm terrible, I know.

** For those just following (newcomers) you may want to check out my last post "My Bloody Valentine." It has some insight as to what's going on..as this is a follow-up to my last post.

For my daily viewer: Updates on the sculpture piece..It is coming along. Slowly. I received my lights for the piece last week. Yes, it will be lit. AND I have a majority of the cuts done. Just waiting on the primer to dry, need the shaping to take place, painting, and lighting.

For now I give you a few images. I had a bunch of small pieces left over so I thought I'd create something fun out of the pieces. Try to guess what each one is!!!

Here are all the pieces I had left over. And here are the puzzle pieces put together....

----------------------------------------------------------------------------------------------
1.


2.


3.


4.

5.

6.

7.

8.

9.

10.


Think you guessed them all right? I don't think they are too hard. A 6 year old should be able to guess these all right. Want to challenge your brain cells? What else can you make with these pieces? 

I'll share the answers in my next post :), and probably give a peek at the progress of my sculpture. So keep your eyes open!

Molto Amore <3 <3 <3 <3